The perfect cast bullet load, just like a perfect garden, doesnít come
easy. A lot of work, knowledge, and perseverance is required. (Those of you who
are homeowners know what I mean.) Rick Kelter of the Los Angeles Silhouette Club
is one of those obsessed souls who sought the holy grail of the perfect cast
bullet load for his Freedom Arms 357
for many years. Now, at long last, heís confident that he has it.
| |
|
 |
|
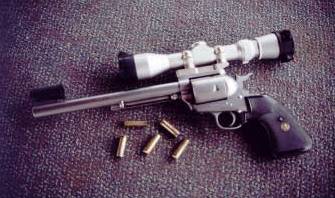
Freedom
Arms test gun and Leupold scope and rings |
I donít know how it came about, but Rick and I were shooting the bull
during a match about this and that and somehow the subject of cast bullets came
up. All of a sudden, Rick, who is a somewhat of taciturn sort of fellow, lit up
and started waxing poetic about cast bullet making. I thought to myself "Wow,
heís really serious about this stuff." Little did I know. Then he said "Would
you like to try some?" Well, I never turn down free food, free drink, or
especially, free bullets, so the answer was an enthusiastic "You bet". A short
time later, Rick had provided me with a couple of hundred bullets and an equal
amount of his specially prepared cartridge cases.
Interestingly, the bullets were neatly stacked in carefully arranged
rows in a couple of old Sierra bullet boxes. In other words, they weren't just
thrown loose into the container like ordinary bullets but stacked in orderly
rows, one on top of the other like so many miniature soup cans in the super
market. After previously talking to Rick about how much care he takes when he
makes his bullets, I instantly knew exactly why he packed them the way he did.
He just didnít want any of those beautiful bullets to pick up any accuracy
robbing nicks or other imperfections while rattling around loose in a box. Bet
you thought I was kidding when I said he was obsessed.
OK. So letís first talk about how Rick makes his bullets. First youíve
got to have good metal. In the past, Rick used straight linotype. However, while
accuracy was very good, he was experiencing a fair number of perplexing ringers
- even with good, solid hits. Since the mold being used was the excellent RCBS
200 grain 35 caliber rifle bullet, there shouldnít have been any problem at all
in taking down the steel animals. Obviously, this became a very frustrating
situation. Then one day, he had an inspiration. He took one of the linotype
bullets, stood it nose up on a hard surface and whacked it with a large hammer
to simulate a hit on a steel ram. Rick said it shattered like a piece of
pottery! He was totally dumbfounded at the result. That was something he
definitely didnít expect. He then took a couple of other bullets and gave them
the same treatment and got identical results. The lino was brittle and was
breaking up when it hit the steel animals and not delivering its full momentum
onto the targets.
Thatís when he switched to wheel weights. So whatís the difference?
Well, lino is made up of 84% lead, 12% antimony, and 4% tin. While tin does have
some hardening effect, itís really the antimony that makes lino as hard and
brittle as it
is, 12% antimony is a lot.
On the other hand, wheel weights are typically made up of 96.75% lead,
3% antimony, and just a quarter per cent tin. Rick also adds an additional 2%
tin to his wheel weights, not for any hardening effect, but because the tin
reduces the surface tension of the liquid lead and will result in the mold being
filled out more completely. Bullets made with a 2% tin content will be very
crisp and sharp. Rick buys his wheel weights in ingots from a local foundry that
has all kinds of casting metals available (Art Green
310-274-1283). The nice thing about buying in ingot form is that the
wheel weights have already been cleaned up, the steel clips removed, and the
metal has been given a basic flux. Rick also gets his pure tin, which comes in
the form of bars much like bar solder, from the same place. Tin can also be
obtained in the form of bar solder from welding shops.
Once he has all his metal weighed out, it goes into an
RCBS bottom pour electric pot that has no other left over metal in
it. This is necessary to make sure his alloy doesnít get mixed in
with another. He then sets the temperature at 700 degrees. Once, the
desired temperature has been reached, he gives the melt a good
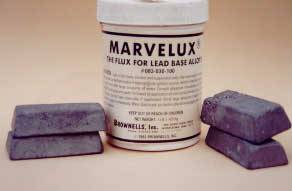
fluxing with Marvelux from Brownells.
|
|
|
The use of wheel weights
demands thorough and frequent
fluxing |
|
Iíve written about Marvelux before and can say there is no more
effective fluxing material around and as an added benefit thereís no smoke or
stink either. Just a half teaspoon is plenty to get the job done. Rick will then
give the pot a couple of vigorous stirs with a big stainless steel slotted spoon
that he picked up in the house wares section of a discount store somewhere and
will skim off the dross.
When working with a new mold, Rick will use denatured alcohol to
remove the packing oil. (I like to spray them with Shooterís Choice Quick Scrub
III.) Heíll then start casting. Itíll take around twenty casts before the mold
will start producing perfect bullets. Rick will then weigh the new bullets to
make sure that their weight is right on the money. If they're a little light,
heíll add some more wheel weights. If theyíll a little heavy, heíll add a bit of
tin. However, this step usually isnít necessary.
Now comes the inspection process. Rick says heís absolutely ruthless
here. If there is the slightest imperfection anywhere, the bullet goes either
into the scrap box or it may end up being a practice bullet. Rick will also roll
the bullets with his finger on a smooth surface. If there are any irregularities, it will become very apparent. Because of the care
heís taken in the casting process, the rejection rate is fairly low - around
10%.
|
 |
|
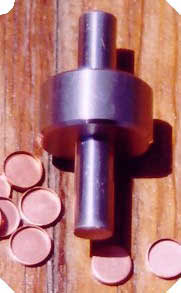
"Dewey tool flares and flattens checks for
an
exact fit." |
|
Now, itís time for gas checking. Gas checks are very important when
using high pressure magnum loads as they strengthen the base of the bullet.
This, of course, is the area which is being subjected to the greatest amount of
pressure. Rick has found that sometimes in the gas check seating operation, the
shank of the bullet will have lead shaved off. Since the base of the bullet is
the most sensitive to good long range accuracy, he feels that even a tiny unbalance from a
loss of metal in the bullet base will diminish accuracy and therefore is a cause
for concern.
Additionally, the face of almost all gas checks
are concave, which means that thereís a bulge on the underside. The result is
that the bulge inhibits the check from being seated perfectly flat against the
base of the bullet. Solution? Go to Mike Dewey, West Coast gunsmith and master
machinist, and have him build a gizmo that both flares the sides of gas checks
and simultaneously removes the bulge, making them perfectly flat. Indeed, when I
first saw Rickís bullets, I noted just how impressively flat the gas checks were
on the base - flatter than any Iíve seen. Again, any misalignment of that gas
check will ruin a perfectly cast bulletís long range accuracy.
Now sizing. I know itís customary for bullet casters to size their
lead .001 of an inch over normal bullet diameter. In the case of the 357 Mag,
bullets will be sized .358 inches. Some will even go a .001" over that to .359"
figuring that more is better. I used to do it myself. The reason this practice
has had success in the past is that the throat diameters of many revolvers were
invariably oversized and differed from chamber to chamber. Consequently, bullets
with standard diameters would rattle around in these extra large throats and not
be aligned properly with the barrelís forcing cone. Result - poor accuracy.
This, of course, is not a problem with the Freedom Arms. The dimensions of the
cylinder chambers are like those of a Swiss watch. Just place a jacketed 357
bullet in the mouth of a FA cylinder and youíll see that itís a very close fit.
When the bullet is fired, itís going to swell from the pressure being exerted on
its base, and the fit is going to be even tighter. The bottom line here is that
itís not necessary to size your cast bullets to a larger diameter when using the
Freedom Arms revolver. Consequently Rick sizes to .357", a mild snug fit in the
throats. If you are going to heat treat your bullets they should be gas checked
and sized prior to heat treating, much easier on both you and your lubri-sizer.
As you might guess, Rickís sizing machine is not your run of the mill
model. He uses a
Star machine
because Star's straight thru, nose first sizing produces a more concentric sized
bullet. Star has
always been known as the Cadillac of sizer/lubricators and was made by Star
Machine Works in San Diego, California. However,
Magma Engineering
in Arizona (480-987-9008),
maker of commercial casting equipment, molds, lube, etc. has bought the
manufacturing rights to the Star machine and is now the prime source for all
Star sizer/lubricators, parts, and dies. So if you have an old Star machine
thatís ailing and needs a part or a new die, thatís where you need to go.
The Starís main feature is that its design doesnít utilize a
conventional top punch that is used by all other sizers to push the bullet down
into the die. As you know almost all top punches come in various shapes in order
to fit over and hold the nose of the bullet in place while the bullet is being
pushed down base first into the die. The problem with this is that even the most
minor misalignment between the top punch and the sizing die means that the
bullet will not be pushed evenly into the die and therefore won't be sized
concentrically all the way around its diameter. Instead, it will be sized off center,
resulting in a slightly out of round bullet. You can guess what happens to
accuracy.
On the other hand, the Star sizer uses a universal, flat punch that
doesn't try to grip the nose. The punch pushes the bullet nose first, down and
through the die. That's right. The bullet is pushed through the die and comes
out of the bottom. To make sure the bullet doesn't get dinged up, Rick pulls the
sizer handle with one hand and catches the exiting bullet with the other. Since
the bullet nose is not being held by a shaped top punch, if there is any
misalignment (there isn't) the bullet is free to self center itself in the die.
Result - a perfectly round, concentric sized bullet. Pushing a cast bullet into
a die off-center has
ruined more perfectly cast bullets than anything else.
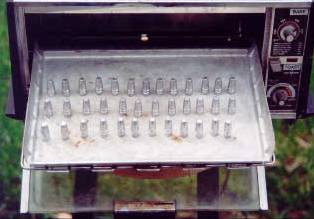
The next step is the heat treat. Rick uses his kitchen oven for this
purpose. (Being a bachelor, he can get away with something like that. I use a
old toaster oven bought at a flea market for $3.) Rick uses the Veral Smith
(LBT) heat treat
method where the temperature is set so that itís just under the melting point of
the lead. (425-450 degrees) Rick judges the
temperature by eye. Heíll put in a couple of scrap bullets in the oven on a
metal tray and if he sees them start to slump, heíll decrease the temp a notch.
Then heíll put in another couple of bullets and try it again until thereís no
slumping. The bullets will now spend at least an hour in the oven.
|
|
|
Heat treating produces
strong, not brittle bullets. (Todd's toaster oven
set-up) |
|
Hereís where it gets interesting, heíll then fill
his kitchen sink with water (I recommend a large bucket if you want to stay on
speaking terms with your wife. I use a Tupperware style dish pan.) and as much
ice as he can get in there. The idea is to get the water as cold as he can
possibly make it. The hot bullets from the oven are then quickly quenched in the
icy water.
Antimony and a trace of arsenic in the wheel weights is the key to the
heat treat process. The combination of as little as 1 % antimony in the alloy
and the heating process coupled with the rapid cooling will significantly harden
the cast bullets. Low amounts of antimony (1%) will result in a 1-2 weeks "curing
period" before the bullet reaches max hardness. Ideally, weíd like to have
between 2.5 - 6% antimony in our melt. Since wheel weights fall in that range
(3%), weíre all set. Near maximum hardness should then occur within 24-36 hours.
RCBS says the water temperature doesnít make any difference in the
heat treat process, but Rick disagrees. Through several years of using his
method, Rick is convinced that the icy water is largely responsible for giving
him a very consistent BHN bullet without the brittleness of lino, and after
using his bullets, I have to agree. Rick uses an LBT lead
hardness tester to determine if the desired hardness has been achieved
(typically 30 BHN). I use the SAECO tester which I reviewed some time back and
which is readily available. Even though these bullets are very hard, theyíre not
fragile. Indeed, when subjected to the "hammer test", they flatten rather than
shatter.
|
|
|
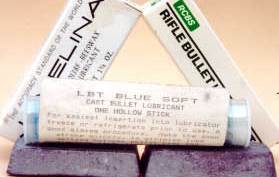
A wide
variety of bullet lubes are available that
work very well |
|
Rick uses LBT blue bullet lube but everyone has their favorite lube, so if you have something
that works for you, go ahead and use it. I just use a standard 50% alox mix from
Javelina and that works fine for me. I know all kinds of fantastic claims have
been made for red lube, green lube, blue lube, orange lube and you name it, but
the plain and simple truth is that none of these lubes has been proven to be any
more effective than any other in any kind of controlled, blind testing in a
machine rest. The only proven difference between them is the price and their
ease of use (or lack of). Just use what you like.
The main thing here is that when lubing, you want to use a sizing die
that is .001 larger than the die that the bullets were sized in. So if you sized
your bullets .357, you want to use a .358 die for lubing. This is necessary to
prevent the sides of the heat treated bullets from rubbing against the side of
the die and being work softened. Now we have the perfect cast bullet.
In Part II next month, weíll talk about case preparation, loading, and
shooting.
|
![]()