Leupold's VX-L scope
If you’ve
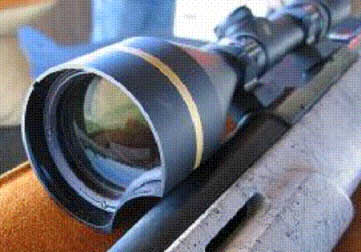
taken a close look at the image in this column of the rifle with the large
diameter Leupold scope mounted on top, you’ve probably noticed that the
bottom of the objective lens and bell appear to have be crushed around the
diameter of the barrel. When I first saw that picture on the internet last
Fall, I wondered how in the world that could have happened. Did the rings
or the mounts come loose so badly that the scope was literally flopping
around and got smashed against the barrel during recoil? Didn’t the
shooter notice? Was this just another internet hoax? Another puzzle was
the fact that the lens isn’t cracked or broken. How do you put a big dent
into a glass lens without breaking it? To find out more, I emailed the
image to a close friend who works at Leupold and asked him if he knew
anything about it.
|
 |
|
Take a
close look at the objective lens on this scope |
|
Well
my friend just kind of laughed and said “Oops, it looks like the word has
leaked out about our new 2006 VX-L scope.” New scope? Really? You did this
on purpose? Yes, it’s true. Leupold has created this new product line to
specifically deal with a couple of problems that result from putting a
large objective scope on a rifle.
There’s no doubt that large diameter scopes (50 mm and up) provide
unparalleled brightness and fields of view. This is especially useful in
low light conditions. The downside is the fact that the big scopes have to
be mounted way up in high rings in order for the bottom of the objective
bell to clear the top of the barrel. When shooting from the bench, having
a scope sitting that high up can cause problems when making elevation
adjustments. Let me illustrate. I have a quality 50 mm scope made by
another manufacturer that totally runs out of elevation adjustment at 100
yards because of the high rings. This requires me to put a couple of shims
under the the scope at the rear ring to correct the problem, which is kind
of a pain in the posterior.
However, the biggest problem arises when you mount a large diameter scope
on a hunting rifle. When the scope is so high up, the rifle must be held
lower on your shoulder, or if you place the rifle butt normally on your
shoulder, you now have to stretch your neck and head up in order to see
the image. Either way, it really doesn’t feel “right”. The whole
rifle-scope combination feels unnatural and awkward when being pointed.
That’s why old grand pappy always had his 4X Weaver mounted in low rings
close to the barrel. When he snapped his rifle up to take a shot on moving
game, the scope’s image was naturally right there in front of his eye. It
just doesn’t work that well with high mounted big scopes.
So
the problem for Leupold was to somehow put a 50 mm scope in low rings.
Solution? Cut a crescent in the bottom of the objective lens and bell.
Now, the scope is literally wrapping around the barrel without touching
it. Cool. Leupold says the 50mm VX-L mounts like a standard 36mm scope in
low rings but will deliver nearly 49% more light to the eye. Additionally,
the 56mm VX-L mounts like a 40 mm scope and delivers an amazing 96% more
light. So it’s a case of literally having both the advantages of a large
diameter objective and lower mounting for easy pointing. I hope to have a
chance to see and look through a VX-L at the Shot Show in February and
will pass on what I find out.
Ken Light Bolt Alignment Shroud
Got an XP with a
super light factory trigger? Want to put a super light factory trigger on
an XP but was concerned about accidental discharges? Let me tell you a
little story.
A
couple of years ago, a friend decided to work on his standing unlimited
class XP-100’s trigger in order to get it down to 1 ounce. So out came the
polishing stone and he went to work. After a lot of effort, he succeeded
in producing a very, very light trigger. The following weekend he was at
the range checking out his handiwork and I decided to watch and call his
shots on the swingers from a position about five feet behind him.
Well, he was
standing next to and a little bit behind one of the round steel poles
holding up the roof over the firing line. As he inserted a round into the
chamber, the XP’s muzzle swung around was now pointed directly at the
steel pole. He then pushed down the bolt to lock the chamber. As soon as
he did so, the gun fired. The bullet then hit the steel pole dead center
at a distance of perhaps two feet and bullet fragments went flying all
over the place. My friend’s forearms were peppered with tiny jacket and
lead fragments. I was also hit in the stomach with a larger piece of
jacket material that penetrated a light jacket, a heavy wool shirt, and my
t-shirt. When I looked, I found a chunk of metal embedded in my hide just
above my belly button. I foolishly wiggled it out and now have a nice scar
to remind me about the dangers of super light triggers every time I take a
shower.
So what does
all of this have to do with a bolt shroud you may ask? Well with super
light factory triggers, when you close or even open the action, there’s a
certain amount of bolt twisting or side to side motion that occurs and
that can trip the sear. As a long time champion silhouette shooter, Ken
had observed this phenomena and has designed a replacement shroud for the
XP-100 that tightens up the alignment of the bolt in the action and thus
reduces the chances of an accidental discharge. This shroud will also
provide a benefit even on guns equipped with custom three lever triggers.
|
 |
|
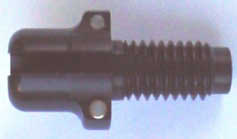
Note the two nylon alignment screws |
|
Alignment is
improved by adding two small nylon tipped vertical screws to the rear of
the highly polished, black, aluminum shroud. Just screw off the factory
steel shroud, and then screw on the Ken Light shroud. Add a drop of blue Locktite to one of the little screws provided, and screw it down into one
of the holes on top of the shroud. Place a .004” feeler gauge between the
nylon tip of the screw and the receiver. Make sure there is only a very
light drag between the screw and the gauge. Then, put Locktite on the
other screw and insert like the first one. Look at both screws from the
rear of the gun/bolt to make sure they’re both protruding through the
shroud the same amount. Now you’re done.
The
nylon tips on the screws will insure that your bolt won’t be twisting like
before and they won’t scratch the receiver. Your gun is now safer and
you’ve probably saved a bit of weight as well. Every XP with a lightened
factory or even a custom trigger should have one of these.
ATK
ATK, the people who own CCI, Speer,
RCBS, Weaver rings, etc. etc. have a bunch of new products this year that
will interest silhouette shooters.
For
starters, CCI is offering CCI Select 22LR ammo. It’s supposed to be CCI’s best
i.e. “The cream of the crop”. The 1200 fps ammo is supposed to be very
accurate and to have great consistency. We’ll check it out and see.
CCI’s
partner RCBS has a new change to their hand priming tool. I’ve always liked
the RCBS hand primer best of all primarily because it was made of metal and
not plastic. I also liked the way the smooth comfortable lines fit my
hand. Above all else, I really like the fact that it used a universal shell
holder. Unlike other hand primer tools, I didn’t need to buy a unique
shell holder for every type of case that I wanted to prime. This year’s tool
adds a square primer tray similar to the round primer tray’s found on other
tools. Now you can use Winchester or Federal primers with your RCBS tool more
conveniently. The previous RCBS tool was primarily set up to use CCI primers
pre-loaded in plastic strips. I still like the old tool but this one is more
flexible.
|
 |
|
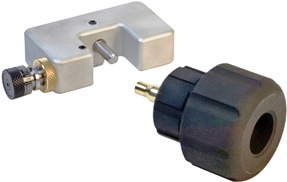
This new tool should make this tedious job much
easier |
|
RCBS also has a new Quick
Change Powder Measure. This measure allows the handloader to change out the
drop assembly drum by simply pulling a pin. One drum accommodates pistol loads
(.5 - 40 grains) and the other takes care of rifles (10-110 grains). The
new parts will be available to upgrade your older model RCBS power measure if
you like.
I also
recently saw an image of a new RCBS hand type case neck turning tool. What
appears to make this one different is there are graduated markings on a dial
that adjusts the depth of the cutting blade. The markings allow you to repeat
your settings from session to session. Boy this is a feature that has been
long overdue. There is also a large, easy grip to hold the case while doing
the turning operation against the blade. Should make things easier when
trimming up a large number of cases. Again, a long overdue feature.
Additionally, ATK Weaver (not Weaver scopes) has new “Sure Grip” scope rings
that are front and rear windage adjustable. These will be useful for sure. As
you know the mounting holes on a lot of barrels aren't aligned very well,
meaning that you end up having to crank the windage of your scope way over to
get on the target properly. We also know the center of the lens is its most
optically correct area. When we crank the windage way over, we’re now looking
out of the side of the lens system and not its center. The result is an image
less than what the scope is capable of producing. We can overcome this problem
by using windage adjustable rings to move the scope into center alignment.
These Weavers are 4 screw types and should be plenty strong. Looks good.
The last
item that caught my eye from the ATK family was the fact that Gun Slick foam
type bore cleaner is now provided in larger spray cans. This stuff is really
easy to use. Just spray in the bore, wait 15 minutes, and patch out. The
foam’s main advantage is that it uniformly covers and sticks to the whole
diameter of the bore and doesn’t run down to the bottom and pool like the
liquid types. Cleans cooper and lead fouling just fine. Before it just came in
tiny 3 oz containers. Now it comes in more practical 5 and 10 oz cans. A lot
of people, especially the rimfire types, swear by this stuff.
MTM
It would
be a very unusual silhouette shooter that didn’t own at least a couple of MTM
100 round pistol and rifle ammo boxes. I really like the 22 ammo boxes as
well. They also make lots of other useful stuff like loading trays, primer
flippers, reloading die storage boxes, etc. My rifle shooting friends also
swear by their gun vice/cleaning cradles and bore guides.
One
series of MTM products that should get more attention though is their
utility/storage boxes. These are perfect for hauling your miscellaneous gear
to and from the range in a hard sided container that will protect it from
being knocked around. Several models even have an O ring seal on them, making
them pretty near water proof. Some, like their Utility Dry box even make a
pretty good seat when spotting silhouettes during a match.
Quick Tip
After a
match, the average silhouette shooter has around 150 dirty brass cases to
clean up. The easiest way to do so is to just throw them in a tumbler and let
them go all night. Most people use the vibrating type and claim they’re
faster, and clean better. In a test I ran several years ago, I found there was
absolutely no difference between the vibrators and the rotating models as far
as cleaning performance was concerned. One thing the vibration tumblers did
excel in though was noise. That’s why I use the big red Thumbler rotating
model with the rubber liner. Works good and it’s quiet. One disadvantage of
the tumblers however is the fact that often the stubborn carbon on the case
necks won’t be removed but merely polished.
If you
just have a small number of cases (50 or less), the Sinclair case spinner is
the best. When used with Never Dull polisher, the entire case comes out
shinier than new - including the neck.
Sometimes
though, I’m just in a lazy mood and want to do the minimum clean up i.e. just
get the baked on carbon off of the case necks. It’s absolutely essential that
the carbon gets removed. Over time, that carbon can be kind of rough on your
reloading dies. The last thing you want is to get them get scratched
inside from the grit on the case necks. Carbon build up will also reduce neck
clearance in your gun’s chamber. Consequently, case pressures can take a big
jump when using max loads. (Anyone reading this use max loads?)
So what’s
a quick easy way to get all that crusty residue off your case necks? Simple -
just get a wad of 0000 steel wool, place around the neck, and give a couple of
twists. Carbon’s gone, and neck is nice and shiny and smooth. Works good. If
you’re more ambitious, you could also use the 0000 steel wool with the
Sinclair case spinner and burnish the whole case. Cases aren’t as shiny as
when using Never Dull, but they come out clean and the method is fast.
|
|