As you’ve
probably surmised from my past columns, I like to clean my guns after
every shooting session as I’ve been a big believer that “A clean gun is a
more accurate gun”. I’ve also taken to cleaning my guns at the range
rather than at home. I do this for a couple of reasons. One - if I wait
to get home, I’m liable to just plain forget to do the job. Second - the
top of my reloading bench is so loaded with stuff that there’s not very
much room available to get the job done conveniently without moving
everything around to clear up enough space. However, cleaning at the range
means hauling everything I need back and forth.
For the
small items like cleaning solution, oil, patches, bore guide, etc. that’s
not a problem. “Big Bob”, my ever faithful Uncle Mike’s police range bag
accommodates all that stuff easily. My cleaning rods however are another
story. I usually take two i.e. one a 36” carbon fiber rod for my rifles,
and a shorter brass rod for my silhouette pistols. To be honest, the rods
are a pain to carry around. They’re obviously long and gangly.
Additionally, they don’t really fit anywhere conveniently and generally
just get in the way. Well, it looked like a cleaning rod caddy was going
to be next on my list of “must buy” shooting gadgets.
These
carriers or caddies can range in price from very little to something very
substantial. A double rod carrier can easily push $40 plus
shipping. Custom jobs cost even more. Caddies generally consist of a
couple of rigid tubes held together by two to four brackets. The idea is
that the rigid tubes will protect the rods from being bent, scratched, or
dinged when packed in the trunk of the car or when in the back of the
pickup. Caddy tubes are usually aluminum, but I’ve even seen steel, and
it’s not unusual for an occasional enterprising soul to use PVC pipe in a
home made rig.
Having
made a substantial investment in a new gun recently, my discretionary
spending was somewhat restricted. That meant I couldn’t go crazy on this
thing. Whenever I need a quality shooting accessory, but don’t want to
spend a ton of money on it, the first place I look is
Stoney Point. They’ve got so
many neat, unusual, and most importantly, useful things in their catalog
you absolutely know that this is a company that’s run by shooters. Just as
importantly, the prices are reasonable. After checking their catalog, I
found that they indeed did have a double rod caddy and so I sent off for
one straight away.
When it
arrived, I found that instead of being an assembled item, it was actually
a kit composed of it’s component parts. Basically what you get was four
24” black anodized 1/2” aluminum tubes, three plastic brackets, two rubber
end caps, two steel sleeves, miscellaneous screws to hold the brackets
together, and a packet of epoxy glue. Assembly probably took me 15-20
minutes.
In essence, by
using the steel sleeves and the epoxy, you glue the aluminum tubes
together so that you have two 48” rod holders. The epoxy sets up in just
about 3-5 minutes, so have everything laid out and in place when you get
to this step so you’re ready to proceed without interruption. You also
need something to mix the epoxy in (I used a paper cupcake thingy). A
little wood popsicle mixing stick comes with the kit.
You just cut
the ends off the glue packet and squeeze out the epoxy and hardener and
stir with the stick. When you do so, the clear glue will turn milky in
color. Just scoop some on the stick and smear on the end of the rod. When
you’ve done so, push the end of the rod into the steel sleeve. Repeat the
process and push the other rod into the other side of the sleeve. A paper
towel is also handy to wipe off the excess glue that’s squeezed out when
the tubes are slid in. The epoxy then needs anywhere from 4 to 24 hours to
fully cure, depending on temperature. However, you don’t have to wait and
can immediately proceed and pop on the end caps, and assemble the plastic
brackets together with the tubes in place.
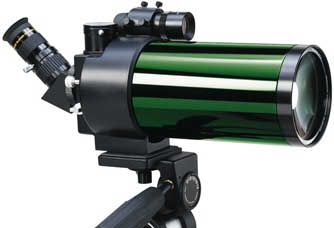
Weaver 90mm Spotter
I’ve
really gotten a lot of positive feedback from my feature article on this
outstanding spotting scope. In fact, I’ve probably gotten more emails and
telephone calls about this product as I’ve ever had about any product.
|
 |
|
"The
Weaver 90mm has been enthusiastically accepted by long range
shooters." |
|
Besides
pistol silhouette shooters from as far apart as the Southeast to the
Northwest, all kinds of non handgun silhouette shooters have picked up on
the story and have contacted me as well (probably from seeing the story on
the internet at (www.lasc.us).
Varmint shooters and rifle silhouette shooters across the country have let
me know how pleased they are with this scope. In a way I suppose that it’s
not THAT surprising, as the resolution of the Weaver spotter is just
amazing. To illustrate, at the last match at the Los Angeles Silhouette
Club, my friend John Zumwalt said he could easily see a butterfly flitting
around up on the hillside beyond the 200 meter line. My old friend Eric
King also seemed to be very impressed with the resolution, and was
planning on buying one as well.
To put
icing on the cake, it looks like there’s been a recent price drop. I see a
couple of places on the internet are now selling it for $279.Orion
telescopes at (www.telescope.com)
is always a good place to check.
It’s also a good
place to buy the recommended optional 40mm eyepiece to get an even brighter,
wider angle view with increased eye relief. It’s nice to see a good product
being appreciated.
Leupold
Alumina Flip Up Lens Covers
I broke the
story here a couple of months ago that Leupold was going to be coming out soon
with this product. Well, they’re on the store shelves as we speak, and these
are undoubtedly the finest flip up scope covers ever.
I was
fortunate to get a pair of covers for the new 2.5 X 8 VX-III pistol scope that
I wrote about last month, and a set for my excellent Leupold 6.5 X 20 VX-III
Extended Focal Range (EFR) scope. So what makes these covers so special?
For one,
they’re made from Aluminum and not plastic. This isn’t just any old aluminum
either, but the same 6061-T6 hardened aluminum that’s used for high quality
scope rings, scope rails, and even fighter aircraft. The covers also have a
very high quality surface finish with a hard coat black matte surface with the
Leupold logo in bronze located in the center of the cover. This is one very
handsome scope cover, and the hard anodizing ensures that it has a very high
resistance to scratches and the like. Obviously, these metal covers are going
to last a life time. Plastic covers won’t.
Another
predominant feature is the fact that they thread on to the scope. Other
brands use a friction slip fit. The slip on’s are ok, but often just routine
handling and general knocking about can cause those other covers to either
come off or get rotated around out of position. When you thread on the Leupold
covers, an “O” ring gasket keeps it from moving and seals the base of the unit
against the face of the scope. A second “O” ring is used so when the flip up
cover is closed, an effective weather & water proof seal is created. I don’t
believe I’ve ever seen this level of engineering and workmanship for this type
of product before.
The front
cover has two contoured tabs or wings that stick out at the 5 and 7 o’clock
positions. Just push forward on the tabs to get the cover to pop up. If you
don’t like the tabs in those positions, you can rotate the cover to place them
anywhere you like. Another nice feature is the fact that when the cover flips
up, it will be leaning back about 45 degrees from vertical. If you like, you
can push it back even farther, so it will now be fully horizontal, or not
sticking up at all. This is handy if you’re using the covers in a field
environment as they are less likely to snag on something in heavy brush. When
the covers are in the down and locked position, they’re held in place by two
small, but very powerful magnets that hold against two equally sized pieces of
steel embedded in the aluminum. Consequently, nothing will ever cause that
cover to flip up unless you want it to flip.
The rear
cover functions the same as the front, with one significant difference.
Instead of using a tab or wing to push against to open, it uses a small curved
lever to, in effect, pry up the cover away from the magnetic “lock”. This
little lever is kind of neat in that being curved, it fits the profile of the
cover in a very artistic way. Obviously, a talented industrial designer was at
work here. Taking the artistic comparison even further, the top of the lever
is also finely checkered for an improved tactile “feel”.
The lever is
fairly small however - about 1/2”. Never the less, I encountered no difficulty
in operating it with my bare hands. I wondered though if a hunter in the field
wearing gloves might run into some awkwardness in operating it. Consequently,
I dug out a pair of heavy woolen gloves from the back of the closet and found
I could manipulate the lever with no problems.
The bottom
line here is that these new Alumina scope covers are the finest that you can
buy - period. There’s only one small catch. Your Leupold scope has to be
threaded to accept them, and as you know Leupold has only just started
threading their scopes to accept accessories. If you have a Leupold scope
without threads, you can send it back to the factory and have them do the job
for a reasonable fee. In fact there’s a 50% sale on that job going on right
now. This is a really good deal since it will allow you to install these
covers to protect your expensive lenses from dirt, scratching, smoke film,
etc. It’ll also allow you to use those image improving Leupold lens filters
that I’ve already written about. If you really want to protect and enhance
your scope investment, you really should do this.
BKL
Bubble
As you know
I’m a fan of BKL aluminum dovetail scope rings. I don’t think you can buy a
better ring at any price, and I use them every time that I can. One
characteristic of the BKL’s is the fact that the machining is very precise and
tight. Consequently, from time to time you might encounter difficulty in
mounting the rings on a dovetail base because the base is slightly out of
tolerance on the width. BKL gets around this situation by having a “spreader”
feature on their rings.
Essentially,
this is another threaded hole on the opposite side of the ring’s base. Just
take out one of the two mounting screws and thread it into the hole on the
other side. As the screw is tightened in, it spreads the “legs” of the base
apart allowing you to slip the ring on the dovetail with no problem. When the
ring is in the position you want, just unscrew and the legs will come together
again.
This is a
very nice feature that’s usually found only on very expensive dovetail rings.
Once your rings are in place, it’s usually not necessary to move them again
and so that extra threaded hole goes unused. It turns out that BKL has just
the accessory to take advantage of the situation. It’s a bubble level - just
like those found on carpenter’s levels. It’s one inch long and simply screws
into the unused hole. Being relatively small, it doesn’t protrude out from the
gun enough to become a problem.
So what good
is it? By observing the position of the bubble in the level, it helps you keep
your gun from canting from side to side. There have been a couple of
excellent articles previously published in the IHMSA NEWS about the deterious
effects of canting, and so I’m not going to repeat them here. I’ll just say
that you don’t want to do it if you can avoid it. The more you cant your gun,
the further you’ll move your shot from where you want it to go.
However some
of us just can’t seem to help doing it. The gun just feels more comfortable
leaning over to the side - sometimes way over. I would also guess that 98% of
those who do cant their guns aren’t even aware that they’re doing it. This
simple bubble device can help you cure that bad habit very easily and
quickly.
There are
more expensive bubble devices around, but if you already own a set of BKL
rings, take advantage of this capability. The BKL bubble level retails for
only $15 plus shipping. By the way, if you’re shopping for BKL rings, check
them out at Sinclair International. You
can find them there for the lowest prices around.
|
|