In the rarefied world of rifle bench rest shooting, a five shot 100 yard
group in the 3’s (.3 of an inch) is considered to be rather ho hum. A
group in the 2’s is decent. Groups in the 1’s are usually match winners
and a group in the 0’s is pretty rare and is considered outstanding. To
achieve these results, only the very best in equipment, components, and
technique are used.
Among the benchrest equipment super stars are the aluminum Panda
actions made by Kelby. I would guess that the Panda action has probably
won more benchrest matches than any other over the last 20 years. Although
Kelby actions have several design features which make them the popular and
consistent winner that they are, the thing that fascinates me the most
about them is the fact that they have a dove tail scope rail milled right
into the top of the aluminum body. As you would expect, Kelby also sells
dovetail aluminum rings made specifically for their actions.
Now think about this a little bit. In most shooting disciplines,
dovetail scope rails and aluminum rings aren't regarded very highly. This is
because they’re usually associated with inexpensive, poor quality products. Yet,
here we have the premier accuracy shooting sport using dovetail scope rails and
aluminum rings extensively. Why?
Alignment. The fact of the matter is that the scope mount points on
most sporting actions are misaligned with each other. It’s just one of those
ugly little facts of life. This is especially true on older guns and actions.
Additionally, when scope mounts are attached to the action by the shooter, they
can be canted or turned slightly one way or another from each other. Clamp a
scope into rings that are out of alignment and you are now twisting and/or
bending your scope and the optical system inside. The result is degraded
performance from your expensive and somewhat fragile scope. To remedy the
situation, the various custom reloading centers will now be very happy to sell
you a lapping tool and the necessary abrasives to polish the inside of your
steel rings into proper alignment. On the other hand, a high quality dovetail
ring system mated with a dovetail rail will avoid these problems.
When it comes to aluminum dovetail rings, there are none better than
those made by BKL Technology of Brownsville Texas. Ask any airgun competitor, no
matter what the discipline, and they’ll tell you BKL rings are the very best.
(Remember, quality air guns are THE most accurate guns in the world and can put
the most accurate bench rest rifle to shame 7 days a week.) Besides air guns,
these rings are also perfectly suitable for any 22 Long Rifle firearm equipped
with with a dovetail rail. In fact, I recently mounted these rings on my
Anschutz Exemplar and my custom Volquartsen Ruger Mk II silhouette guns.
 |
 |
|
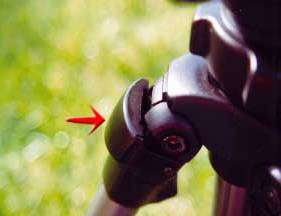
"Double BKL rings on Anschutz dove tail make double sure the Burris
scope won't move" |
|
|
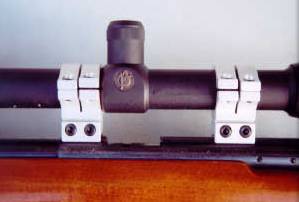
"Ruger MK II - offset BKL rings provide additional
versatility" |
|
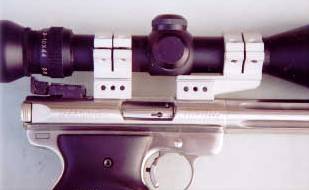
BKL even has an adapter dovetail rail that can be mounted on any TC
Contender, making the number of guns that can use these rings even greater. This
immediately raises the issue of whether dovetail rings are going to slide around
during recoil. For a TC chambered in 22 RF, absolutely no problem. For a TC 22
Hornet, 270 Ren, or similar chambering, absolutely no problem. For most 7 TCU
or similar loads, I prefer to use BKL rings with two clamping screws such as the
model 263 and model 278 offset rings shown in the photos for a little extra
insurance. Actually though, the possibility of aluminum rings slipping in an
aluminum rail isn’t as high as some might think. It turns out that the
coefficient of friction between the two is fairly high. As mentioned before,
benchrest shooters use them all the time without the slightest bit of slippage
in their 6 PPC rifles. The fact is that aluminum dovetail rings on a aluminum
rail can be be extremely stable and also offer the advantages of high strength,
low weight, and precise scope alignment.
So what makes the BKL rings so great? Well, for one,
they’re beautiful. After CNC machining, they’re tumbled to remove burrs and to
take off all the sharp edges that can bite into and mar a scope. This tumbling
process also gives their silver rings a soft satin like finish that is just
absolutely gorgeous to the eye and silky to the touch. The visual effect is
especially enhanced when contrasted with the black, oversized, #8-32 clamping
and cap screws. Most others use a #6 screw which doesn’t have anywhere near the
78 inch-pounds of torque or the 1960 lbs of yield force that these screws
provide. Believe me, when these fellows are locked down, they’re not moving.
The scope bases are also very precisely machined to insure a very
accurate fit on the rail. The rings will fit both standard 3/8" rimfire rails
and 11 mm airgun rails. The fit is so precise that on some non BKL rails you
might have a just bit of trouble sliding the rings on the gun. No problem. Just
reverse the clamping screws, and the base of the rings will be spread apart for
easier mounting. Once on the rail, lapping is never required.
Another nice feature that these rings have is a stress relief slot cut
in the "stem" or body of the rings. When clamping scope rings on a rail,
considerable force is being applied to the base. This force can distort lesser
rings and affect alignment. However, the stress relief slot on the BKL rings
lets the bottom of the base move without it affecting the ring above. A very
nice engineering feature.
The rings are also unique in that they’re hard coat anodized. This is
a process that’s used to harden aluminum pistons, cylinders, hydraulic gears,
and even turbine blades. It provides a super long life span, is very abrasion
resistant, is almost totally impervious to outdoor conditions, sports an
extremely hard surface, and is heat resistant to the melting point of the
aluminum (1,221 degrees F). Cheap aluminum rings are sometimes anodized to give
them color, but they’re never hard coat anodized.
So how hard is hard coat anodizing? Well the anodizing will penetrate
the metal around .003" and will typically run 60-65 on the Rockwell scale. How
hard is that? The metal file you have on your workbench is about the same
hardness or maybe a little softer. The point is that these are very tough rings.
In fact, they’re more scratch and ding resistant than many scope rings made of
steel.
Bottom line - BKL rings are the best you can buy and the prices are in
line with lesser scope rings made by the majors. Visit the BKL web site at
or call at 877-255-2001 and request a catalog. By the way, they will also make
custom scope mounts to your specifications.
Choosing a Tripod - In previous articles and columns I’ve written about the importance of having
a good quality tripod, especially when using a large spotting scope. 80mm scopes
are all the rage now, and there’s no doubt that they provide very bright images
and impressively wide fields of view - qualities that are very important to do
the best job when spotting silhouette targets during a match. However, all of
the advantages of those expensive optics can be effectively reduced when a big,
heavy scope is mounted on a flimsy tripod.
It’s another one of those mysteries when you see someone on the line with a
tricked out XP-100 that cost around $1,200 and a high quality 80mm spotting scope
that costs around $700 or more, and they’re using a tripod that is selling down
at the local Wal-Mart for around $59.95 - tops. I’ll never criticize anyone for
trying to save a buck, but in this instance, it’s a clear cut case of downright
false economy. Why?
Stability, or the lack of. Put a large heavy scope on a wimpy tripod and the
result is shake and vibration, and the consequence of that is you won’t be able
to clearly see what you want to see. I can’t tell you how many times when I’ve
been spotting for various folks and the scope has been bouncing around all over
the place because it was mounted on a Blue Light Special. Every time I put my
hand on the scope to adjust the focus, it would jump and shake and sometimes
would continue to do so even after I removed my hand. In one instance, the
tripod was so wobbly, that just the small movement of air created by someone
walking by would move the scope. Really - I’m not kidding. Trying to call the
shots under those circumstances was very difficult.
All scopes deserve a decent tripod, but the large objective, quality scopes
particularly need a quality tripod because of their size and weight. So what
kinds of features should we be looking for when we go shopping for a quality
tripod?
Portability - First we have to decide on just how portable the scope has to be. The tripod
that we take into the field is going to be very different than the tripod that
we take to the range. A field tripod should be as light as we can find for an
easy carry over long distances. On the other hand, a range tripod only has to be
carried from the trunk of the car to the firing line. The heavier the tripod,
the more stable it’s going to be. So weight, rather than being a negative
quality, is a highly desirable feature for a range tripod. In fact, weight is
THE most important factor in determining how stable a platform your scope will
be sitting on. Some light weight tripods will feature a hook under the center
column to hang a weight from to make it more stable. This works, but is a hassle
to deal with when moving the tripod from position to position as the weight will
start swinging around and induce movement into the tripod. Just shop for the
heaviest tripod you can afford without the necessity for a hanging pendulum.
|
 |
|
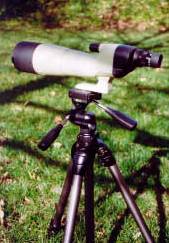
"Big 80mm scopes like this Nikon require good quality tripods
for the best viewing" |
|
Rigidity - Besides weight, rigidity is what keeps a tripod
stable. High rigidity is the result of several factors. The first is the
diameter of the legs. On my good quality tripod, the legs are round tubes
1.25" in diameter. I’d consider this to be the minimum for a quality
tripod. The thickness and type of the metal used for the legs is important
as well .
Are the legs anodized or chrome plated steel, stainless steel, or are they
thin aluminum box tubing. Steel legs are heavier, stronger, and more
stable. Carbon fiber is the "in" material for tripod legs now. The
advantages are strength and light weight. They’re a good material for a
field tripod but for a range tripod we want all the weight we can get. Carbon
fiber is also very expensive.
The legs should also have some way of being locked in place when
spread open. Most tripods will use folding internal braces for this purpose. If
so equipped, make sure the braces have some kind of locking mechanism and then
use it to get the max in rigidity that the tripod is capable of delivering. Some
more expensive tripods will use locking clamps at the top of the legs that then
snap into place when the legs are moved into various positions. With this
arrangement, the legs can be spread out even further than normal for even more
stability and locked in place.
Rigidity is also determined by how many leg extensions are available.
Tripods will have either three or four telescoping leg extensions. This is
another situation in which more is not necessarily better. In some cases, having
four short leg segments will allow the manufacturer to produce a tripod that
when telescoped together, is very compact in relation to its extended height. In
other cases, if the four leg segments are very long, the tripod can reach a very
considerable height. However, the longer the legs and the more segments in the
legs, the less rigid a tripod will become. When using a tripod, never extend the
bottom leg segments unless it’s absolutely necessary. This is because they’re
the thinnest and the least strong and will therefore make the tripod more shaky
than when not used.
The leg segments these days will usually feature a locking lever to
clamp them in position once they’re extended. Some tripods use a threaded collar
for the same purpose. The threaded collar is stronger and more rigid while the
locking lever is more convenient. Occasionally you’ll see a tripod that has
large, plastic handled, side mounted, screw in bolts to secure the legs. These
are normally used only for very large tripods used to mount really heavy
instruments. If you choose a tripod with the standard locking lever arrangement,
make sure they’re strong and beefy. I had a cheap tripod once where the flimsy
plastic levers wore out after only a year and the tripod had to be discarded
because it cost more to repair than it was worth. Over the long run, cheap is
very expensive.
Heads - More expensive tripods will offer a variety of heads while less
expensive types will be limited to one which is permanently attached. A quality
head will be made strong and heavy. This is important as this is the place where
your expensive scope will be attached to the tripod. Cast metal is best. If
plastic, make sure it’s very thick and rigid. On the cheap tripod I mentioned
before, the head would bend and flex when I hung my chronograph sensor bar on
it. The 2’ bar couldn’t have weighed more than 2-3 lbs. Look for lots of
strength in this area. It’s important.
The most common head is the the tilt and pan. This is
controlled with a single handle, and will allow you to move the scope up and
down and to swivel from side to side. Another of this type will have a second
handle and will move the scope or a camera from the horizontal to a vertical
position. If you use the tripod for both range and photography work, this could
be an advantage.
|
 |
|
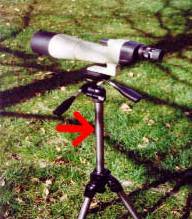
"Make sure locking levers
don't protrude where they can be snagged and release the scope" |
|
A fluid head is designed to move a video camera in a very
smooth, seamless fashion so there is no jerkiness or bouncing when panning a
scene. Spotting scopes really don’t need this type of head.
Then there’s the ball head. This is like a ball joint on a car
and it is the most flexible and useful of the three types. With this one, you
can point your scope in any direction or angle that you want. It’s also the
easiest to use. Once in position, you lock it in place with a lever. It’s
usually found on only professional quality tripods however.
The head should also have an attachment plate as well. This is a small
removable plate that screws into your scope’s mounting point. It should be
thick, heavy, and strong.
|
 |
|
"Attachment
plates should be heavy and made of strong materials"
|
|
A lot of people like to leave the plate on the scope
for easy removal and mounting. When the scope is mounted, the attached plate is
locked in position with a lever. Make sure the lever doesn’t stick out so it
can’t be snagged open on a shirt cuff or such and send the scope crashing to the
ground. On better quality tripods, the attachment plate is secured by both a
locking lever and a release button.
Extension Column/Center Column - Almost every tripod has one of these. The purpose is to extend the
height of the tripod beyond what’s available from the legs alone. Cheap tripods
usually have short legs, even with all the leg segments fully extended. This
then forces you to extend the center column when you’re using the scope in a
standing position.
|
 |
|
"Scopes on tripods with the center column fully extended can be
easily knocked over" |
|
Generally speaking, you don’t want to use this feature. Use the tripod
legs only to elevate the scope. In turn, this means that you should buy a tripod
that will be as tall as you are with the legs extended. The reason I say this is
that the further you extend the center column, the higher the weight of the
scope will be elevated above the tripod’s center of gravity and the more
unstable it will become. I’ve seen the wind blow over scopes and tripods when
the center column has been extended way out. You don’t want that to happen to
you.
On some tripods, a gear drive operated by a crank is used to extend
the column. This is a good feature as it lets you easily elevate the scope in a
very precise manner. On other scopes, even some expensive ones, the column is
elevated by unscrewing a locking collar and pulling it out to the desired
position. Whether a gear drive or pull up type, make sure that the locking
mechanism is firm and positive. Also make sure the diameter of the center column
is at least the same as the legs for the best stability.
Where To Shop - There is a tremendous amount of competition in the camera, video, and optics
industries, and that applies to tripods as well. Shop the internet and also
check out e-bay for used, high quality tripods. Check out the camera stores, but
stay away from the mass merchandisers. They usually deal with bottom of the line
models and/or "value" type tripods. You’ve invested the big bucks in your 80mm
scope, don’t diminish its capabilities by strapping it on a shaky tripod.
Accessories - Quality tripods do have a variety of accessories available. These range from
specialty kinds of feet for the legs (spikes, rubber, extra wide, adjustable,
etc.) to slow motion attachments or even leg protectors. Probably the most
useful of these accessories are aprons with lots of pockets for odds and ends.
These tie on to the legs. Also there’s carrying bags which keep your nice tripod
from getting dinged up in the trunk of the car and clip on carrying straps.
So how much should you pay for a quality tripod? In my area, the Slik 700 DX
has established a loyal following. It’s heavy (8 lbs), strong, rigid, made with
the minimum of plastic and lots of metal castings, and is easy to use. By
shopping on the internet, you can get it for around $150 which includes
shipping. However, that’s only one example. There are a lot of choices out
there. So shop around and consider the characteristics we’ve discussed here and
I’m sure you’ll be happy with your selection.
Fred Smith - Just found out that Fred Smith, owner and operator of