|
Chapter 8 |
|||||||||||||||||
|
Idle Musings of a Greybeard Caster…. |
|||||||||||||||||
|
There are a number of things that a caster learns with experience that don’t necessarily fit neatly into a well-defined, compartmentalized chapter format. We decided to include these tid-bits in kind of a catch-all section to pick up all the “little things” that we would like to teach a new caster that might not fit in elsewhere. With no further ado…. Getting started. A very common question is, "I'm thinking about getting into bullet casting. What's the best way for me to get started?" Well, that depends on what kind of shooter you are, how much shooting you do, and what you want to get out of your shooting. While shooters and goals differ, there is a common solution that will teach a great deal to the novice caster, do it affordably and generate a lot of fun in the process. Stock up on .38 Special and .357 Magnum brass, buy a pound of Bullseye and a pound of 2400, pick up an RCBS 150 grain SWC mould and a 10-pound lead pot, and a 5-gallon bucket of wheelweights from your local tire store. Cast as many SWCs as you can, and try a variety of loads to satisfy yourself what works best. Try a handful of different lubes, crimps, primers, etc. so you get a feel for what works and what doesn't. When you've finished either the 2 pounds of powder or the 5-gallon bucket of wheelweights, you will be a better pistol shot, and you will have a good working knowledge of the fundamentals of bullet casting, cast bullet loading and you'll be ready to move on. Now you can start picking up new bullet moulds to scratch different itches... Flaring the cases. ALL CASES (straight, tapered, bottleneck, etc.) need to be flared before seating a cast bullet. A cast bullet needs to be able to enter a case smoothly and easily. If you just cram a cast bullet into a re-sized case like you would a jacketed bullet, you will almost certainly damage the bullet and get very poor accuracy when you fire the round. The case mouth needs to be flared slightly to allow the bullet to slide in as though it was greased (it is, after all). If you can feel the stop-n-go resistance of the driving bands during the seating process, you are almost certainly damaging the bullet, and you’ll need to flare the case mouth a little more. This can be done with a standard flaring die (e.g. .38 Special), with a Lyman M-die, or by using a home-made universal flaring die. Excessive Processing. Excessive manipulation of bullet metal will lead to a depletion of some of the valuable components (e.g. tin). Fluxing too often is one way to do this. A friend of mine likes to “flux” the metal even before it’s melted! (“It makes it melt better.” he says…) He is confusing the use of road salt to melt snow (colligative properties of liquids, solutes lower the melting point) with fluxing molten metal (which does not dissolve in the alloy and serves to extract certain impurities, and minimize the oxidation). He also likes to flux the pot about every 10 or 12 pours. All this activity does nothing to improve the alloy, is a waste of flux, and just cruds up the lead pot (he prefers pine rosin for flux, which does a fine job and smells nice). When he skims the dross after each of these fluxings, then the alloy can be depleted of some of the minor components, like tin, arsenic, etc., resulting in the quality of the bullet metal dropping off with time. Melt the alloy, skim the dross, flux the metal once at the beginning of the pot and cast your bullets. If you’re oxidizing your tin too quickly to make it to the bottom of your pot, then you’re casting too hot, turn the pot temp down. I prefer to use a heaping tablespoon of sawdust for flux and leave it in place to inhibit oxidation from taking place. Smoking moulds. The same casting buddy likes to smoke his moulds 2 or 3 times during each casting session. Smoking bullet moulds is a time-honored tradition in bullet casting and is done to help the mould release the bullet by coating it with a thin layer of soot (poor man’s graphite). I have seen cases where his moulds were so sooted up that the blocks wouldn’t close fully and bullets were coming out frosted -- not because of crystallization of the antimony, but rather because the cavity surface of the mould was physically roughened as a result of the carbon deposits. The idea behind smoking moulds is to enhance their ability to “let go”, but if the cavity gets rougher, just how easily is it going to “let go”? In addition, soot quickly fills up and blocks the vent lines in the mould faces, preventing the mould from venting properly during the pour, leading to a steady stream of rejects. I have much better results getting moulds to release easily by cleaning them with a toothbrush and cleaning solvent (e.g. Ed’s Red or WD-40) than by smoking them. If you must smoke your moulds, do it once. If the bullets start to get sticky after that, then clean mould before you smoke it again. Building up coal deposits inside your mould cavity is a lousy way to make good bullets. Cleaning the Lead Pot. I’ve heard of just about every method imaginable for cleaning lead pots -- wire-brushes, electric drills, cold chisels, scrapers, even sand-blasting. By far the easiest and best way to clean out the residues that eventually accumulate is with hot water. Take a cup of near boiling water, pour it into the room temperature pot (it should be obvious that you DON’T do this with a hot pot!), let it stand for a minute or two (stirring occasionally), then drain it out. Your pot (and pour spout) will come out remarkably clean. A word of caution: don’t try to heat the water by putting a cup of cold water in a cold pot and then turning the pot on. It takes a while to heat the water to its boiling point, and by the time the water approaches boiling, the heating element has gotten MUCH hotter. The water will go from warm and steaming slightly, to Mt. St. Helens in a matter of seconds. Bad idea….. Heating the Sprue Plate. Mould temperature and pot temperature are two variables that are addressed in virtually all of the cast bullet literature. A problem that is commonly encountered and not generally addressed is bullets that are poorly filled out and wrinkled, and frosty, suggesting that the mould and/or alloy might be too hot. This problem is especially prevalent in the aluminum moulds that are so popular today. The caster usually figures his alloy must be too hot since the bullets are frosty, so he turns the temperature down and the problem just gets worse. His next conclusion is that problem must be with his alloy or how it was processed, and so he goes back and fluxes it again and again, and once more no improvement is seen. The mould and pot temperatures may well be too hot, but the real problem is that the sprue plate is too cool. The steel sprue plate takes longer to heat up than does the aluminum mould, so the molten alloy is getting poured through a chiller before it gets into the mould cavities, the viscosity increases, the alloy is no longer able to fill out the cavity properly, and the bullet comes out wrinkled. It’s frosty because the mould blocks are indeed hot and it takes a long time for the alloy to cool down from that point on so the antimony
gets a chance to segregate, but the problem lies in the fact that the alloy is too cool when it enters the cavities. The solution to this problem is to make sure the sprue plate is fully heated up before casting. For typical iron/steel moulds, this is no big deal since both the mould blocks and the sprue plate have similar thermal conductivities and heat up at the same rate (this is why the problem isn‘t addressed in the classic casting literature, historically ferrous moulds have been used). But for aluminum moulds, the aluminum blocks heat up much faster than does the sprue plate. The caster can either heat up the sprue plate by casting a bunch of rejects, or he can pre-heat the mould upside down on the rim of the pot, so the heat enters the mould blocks through the sprue plate, thereby ensuring good thermal equilibrium between the two. This is also an issue when casting with the 8 and 10 cavity H&G gang moulds, with their gargantuan 3/8” plate steel sprue cutters. There’s more steel in one of these sprue cutters than there is most 2 cavity moulds! The sprue plate must be hot to cast good bullets! Seating stubborn GCs. Most of the time, I just snap them on with my thumb, but as we all know, every so often you run across a mould that has an oversized GC shank and getting the GC onto that shank takes more than thumb pressure. In the past, the way I dealt with this was to place a small piece of 1/8" flat-stock over the sizer die and use the nose-punch to push the bullet down into the GC. This works fine (if the bullet isn't too long), but it's kinda slow. Recently, I found a pair of well-used channel lock pliers at a pawn shop that a previous owner had taken the jaws to a belt sander and ground off all the teeth, leaving the jaws smooth. They cost me all of 50 cents, and it turns out that they work quite nicely for seating GCs onto recalcitrant shanks. I use the channel locks to seat the GC's onto the bullet shank, then I size the bullets normally. The flat faces of the channel locks get them seated squarely on the base, and the crimp keeps the GC solidly in place. The adjustable jaws of the channel locks allow me to keep the jaws more or less parallel, and squarely seat GCs on a wide variety of bullet lengths. And my thumb is grateful... Preventing damage. Anytime your mould faces are open or when the mould blocks are not attached to the handles, the mould is vulnerable to damage from dings and dents. Please remember that any time the mould faces or top are exposed, they can be easily nicked, dinged, or dented in the area of the cavities; possible ruining your mould. Also, remember that should you accidentally drop your mould, it can be ruined. Storing mould blocks rubber-banded together is a good way to prevent much of this damage. Venting. It is very difficult to cast a useable bullet from a mould that is inadequately vented. Some of the more common mass produced moulds usually come out of the box with vent lines that are partially blocked at the cavity. This can occur in most any mould made with vent lines. The partial blocking of the vent lines occurs in moulds that have the blocks vented before the cavities are cut with the cherry. Almost all machineable material leaves small burrs at the edges of the machined area. In moulds this occurs at the edges of the cavities. The burrs themselves are normally quite small, but can be enough to partially block the very thin vent lines. These burrs can be easily removed with the blade of a pocket knife, but is recommended that a 60o bent checkering file, fine cut, be used as it leaves no inside burrs and does a much cleaner job. Only remove the burr. Do not attempt to cut the vent lines deeper. After the burrs in the vent lines are removed, the edges of the cavity can be lightly rubbed with a piece of 0000 steel wool to ensure smoothness at the site of the vent. Proper fit of mould blocks. For many years gun writers have written about their opinions as to how mould faces should fit together. Some say you should not be able to see any daylight between the halves when held up to a strong light. In reality, a small amount of light showing through the mould halves is good for venting the air from the cavities. Moulds fitted too tightly can be frustrating to use if not adequately vented. Frequently, a new mould has been made to cast more easily by getting the mould and the alloy at much higher than normal operating temperatures. While using the mould at this extreme temperature, the user notices that all of a sudden the mould starts casting perfect bullets with little effort. What has happened here is that the blocks became so hot that they warped just a little, but enough so that the mould became self-venting as light was then visible through the halves. Once the mould “opened up” it allowed the cavities to properly vent and the alloy could then fill into the cavities completely without fighting with the trapped air. Misaligned Mould Blocks. If you find that a mould is throwing bullets that are significantly out of round, or if after sizing you notice that the bullets are heavily burnished on one side of the seam and untouched on the other, then the problem is likely to be that one (or more) of the alignment pins are not properly engaging . After the blocks have
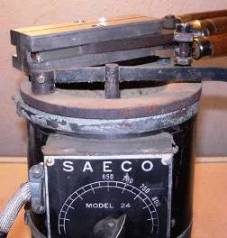
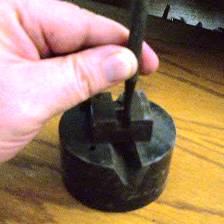
cooled down, remove them from the handles; when the two halves of the mould are brought together there should be little or no light visible at the interface, and there should be zero slippage of the blocks relative to one another. If you can see a significant line of light between the faces, the blocks could be warped, there might be small particles of metal holding them apart, or the alignment pins could be pushed too far out of their foundation holes and are preventing the blocks from closing fully. If there’s any slippage between the blocks, then the alignment pins are seated too deeply into their holes and need to be adjusted. Take a piece of 2 x 4 with a ¼” groove routed in it. Place the mould block face down with the alignment pins in this groove and the blocks supported on both sides of the groove. Using a 3/16” drift punch and a hammer, gently tap the backside of the pin until it extends far enough out of its hole to engage the alignment hole in the opposite block. Check to make sure that there is no gap between the faces of the mould blocks caused by the pin protruding too far and holding the blocks apart (if so then gently tap it back in). Once the alignment pins are properly adjusted, then bullets should drop much closer to round and proper size. Cleaning a Mold. Valuable tools for cleaning moulds include an old toothbrush, flat tooth-picks and Q-Tips, in conjunction with a good cleaning solvent like WD-40 or Ed‘s Red. For aluminum moulds, these are the only tools I use for cleaning. Using steel tools, or steel wool, to clean any mould can round off cavity edges, scratch the faces and otherwise do damage to your precious mould, making it a bad idea. For steel moulds, you can also use bronze wool, or a bronze brush for cleaning along with a suitable cleaning solvent. This is an excellent way to remove surface rust from a rusty old mould and do so without rounding the edges on the cavity or scratching the faces of the mould blocks. A bronze brush also is a great way to clean out those insidious little flakes of metal that like to get stuck in the vent lines and block them. For long-term storage of an iron/steel mould, I paint them liberally with Ed’s Red using an old toothbrush. The carrier solvents help the Dexron III penetrate into the pores of the metal, and inhibit oxidation. Mould release. Some folks get all wound up about how it's impossible to get a mould to drop bullets cleanly without spraying some kind of magic goop all over it. I've seen moulds that were so heavily coated that the blocks could not close completely, and all of the vent lines were filled. You will never get a quality bullet from such a mould. If you want to use a release agent, then fine, go ahead, but use it lightly. Just like smoking the mould, if a little doesn't do the trick, then clean the mould. In my opinion, there is no need for mould release, all is does is gunk up a mould and block vent lines. If your mould is not dropping bullets easily, then it probably needs to be cleaned (or lapped). Cleaning Solvent. Ed Harris developed a formula for a cleaning solvent that he preferred for general all-round firearm cleaning that he called “Ed‘s Red“. It’s an excellent cleaning solvent. He had half a dozen ingredients that were included for various reasons, some well-founded, some a little questionable. Now that I’m well into my third decade as an experimental organic chemist, I have a pretty good feel for solvents, how they work, what they do, and how to best achieve the desired properties. I did some minor tweaking (and simplification) of Ed’s Red formula and have a cheap, simple and highly effective cleaning solvent that I use for almost everything gun related, particularly bullet moulds. Basically, I replaced the acetone with the less volatile MEK, and got rid of the lanolin and mineral spirits (which is a poor solvent for this application), and kicked up the xylene content (an excellent solvent for removing powder fouling, petrified greases, bullet lubes, etc). With no further ado:
Gravity segregation. Some folks like to think that if you don’t stir your lead pot, the components will separate according to their differing densities. Nope. They’re all soluble in the melt and Brownian motion insures that they stay well mixed. No gravity segregation will take place in your lead pot. A little test you can perform for yourself at home: dissolve a teaspoon of salt in a glass of water. Stir it thoroughly and set it aside overnight. Table salt is over twice as dense as water (just like lead is approximately twice as dense as either antimony or tin). If homogenous solutions spontaneously gravity segregated, then this one would do so just like the hypothetical segregating lead alloys. Let this salt-water stand undisturbed over night, then carefully remove a spoonful from the surface of the glass and taste it, is there still salt in that surface water? Lapping a mould. It’s not uncommon for a mould cavity to be out of round, in some cases this can amount to several thousandths difference depending on where the diameter is measured. One way to clean this up is to lap the mould (check the alignment pins first!). Lapping can also be used to enlarge the diameter of the bullets if they are dropping out undersized, or smoothing out a rough cavity (either tooling marks or pitting). Keep in mind that this (like any lapping process) is a metal removal process and as such should be done slowly and carefully, stopping to check dimensions on a regular basis. The simplest way to lap a mould is by hand. One simple method for hand-lapping a mould cavity is to take a nail, hammer the tip flat and then bend the flattened portion in a right angle to form the lap handle. Remove the sprue plate from the mould. The flattened portion is then inserted into the center of the cavity and the mould cavity filled with bullet metal around the lap handle (make sure no part of the steel nail is “peaking out” of the lapping surface as this can scratch your mould). Allow the lap to cool, then wipe a drop of oil across the entire surface of the lap, followed by a coating of abrasive. I generally start with 400 grit silicon carbide. Valve grinding compound is generally either 180 or 220 grit alumina, either of which will remove a lot of mould metal fast, and should be avoided if you are just smoothing the cavity out. Mould metals (aluminum, brass, leaded steel, iron, etc.) are all pretty soft stuff, and all of the commercially available lapping compounds are considerably harder, so the identity of the lapping compound (i.e. alumina, silicon carbide, silicon nitride, etc.) isn’t as important as the particle size (grit). Once the lapping compound is in place, then the coated lap is inserted in to the mould, the blocks closed and the lap turned by hand, using the handle to rotate. There will be resistance, and in fact it’s not uncommon for the lap to only turn part way at first. Just keep working it until complete, free rotation is achieved, at which point the lap is spent. Clean the mould, heat it up, cast a bullet and measure it to see how close you are to the desired diameter and roundness. Repeat as necessary with a freshly poured lap (you can melt the old lap off of the handle by simply immersing it in the lead pot). This isn’t really as time-consuming as it sounds like, but it does take a while. Just look at it this way, you can spend the rest of your life shooting poor quality, out-of-round bullets, or you can invest an hour or two and spend the rest of your life shooting near-perfect bullets. Your call. If you have access to the appropriate power tools, moulds can also be lapped under power. In this case one takes a bullet cast from the mould, wraps it in electrician's tape, chucks it up in a 3-jaw chuck on the lathe, center drills the base and taps it. The lap is then threaded onto an appropriate shank (e.g. bolt, all-thread, etc. -- do NOT use any kind of pointed or self-starting screw!). If a bolt is used, cut off the bolt head. The shank is then chucked up in a drill press, the lap coated as before, inserted into the mould cavity and the drill press started with the mould braced against the drill press table. Pressure measurement -- psi vs. CUP. Questions often arise about these two methods of measuring pressure and whether or not they can be correlated to one another. In short, both scales measure pressure, they just go about doing it in different ways. Piezoelectric strain gauges have a very fast response time and give you pressure (in psi) as a function of time, and the peak chamber pressure is simply the top of the P vs. T curve. The older crusher method had a standardized metal pellet (typically either copper or lead, depending on the pressure range being monitored) inserted into a hole drilled into the side of the chamber, and was then backed by a monolithic anvil. When the cartridge was fired, the pressure generated distorted the pellet, and the amount of distortion was directly related to the peak pressure exerted on the pellet. The length of the pellet was then measured and the length looked up in a table of reference values to determine the peak pressure. These reference pressures were also in psi. So why do we call these pressure determinations CUP (copper units of pressure)? Very simple. The table of reference values are in psi, but they are determined under static equilibrium conditions. For example, when a static load of 50,000 psi is applied to a copper crusher pellet, it will compress a specific amount, but when that same pellet is subjected to a .30-06 cartridge at 50,000 psi, it will compress somewhat less, leading to an apparent chamber pressure of somewhere around 40,000-42,000, so instead of calling it psi, it was decided to name these units CUP so this offset would be inherently included in the measured result. Why is there this discrepancy? Very simple, TIME. It takes time to move metal, so when a load is applied to the copper pellet it takes time for it to achieve its new equilibrium conformation. The millisecond or so that it experiences the peak chamber pressures of the fired cartridge may not be long enough to complete this rearrangement. How far is it off? That depends on the pressure being measured. For pressures below about 30,000 the two pressure scales are virtually identical (at these lower pressures, the pellet doesn't change much and it doesn't take very long for it to achieve its new conformation). Between 30,000 and 40,000, the CUP scale starts to lag behind the psi scale, and above 40,000 the two scales start to differ significantly (60,000 psi corresponds to roughly 50,000 CUP and 100,000 psi corresponds to about 70,000 CUP). There is a calibration curve correlating the psi and CUP pressure scales in "Firearms Pressure Factors" published by Wolfe Press (this is an excellent book, and is recommended for anyone who handloads ammunition). |
|||||||||||||||||
|
|
|||||||||||||||||
| Table of Contents | Continue to Chapter 9 - Moulds and Mould Design | ||||||||||||||||
| Index of Additional Glen E. Fryxell Shooting Articles | |||||||||||||||||